
In this article, we’re going to learn all about how we can add, change, replace, and remove nodes from the DOM. We’ll be looking specifically at the createElement() and createTextNode() methods.
Creating New Nodes
Let's create the following HTML file:
<html lang="en">
<head>
    <title>Master the DOM!</title>
  </head>
<body>
    <h1>Master the DOM!</h1>
  </body>
</html>
Open up the Console tab in Developer Tools.
Let’s use the createElement() method on the document object to create a new p element.
const paragraph = document.createElement('p');

console.log(paragraph);     // <p></p>
Success! The paragraph variable gives us our p element.
We can now add text to our element, with the textContent property:
paragraph.textContent = "I'm a paragraph!";

console.log(paragraph);     // <p>I'm a paragraph!</p>
By combining createElement() and textContent we can create a complete element node.
We could also use the innerHTML property to add content to an element. With this property we can add both text and HTML to our element:
paragraph.innerHTML = "I'm a <strong>bold</strong> paragraph!";
Of the two methods, textContent is superior — it’s slightly faster to render than innerHTML.
It’s also possible to create a text node using the createTextNode() method:
const text = document.createTextNode("I'm a text node!");

console.log(text);    // "I'm a text node!"
All of these methods have created new elements and text nodes, however, they are not visible on the front end of a website until they’ve been inserted into the document!
Inserting Nodes into the DOM
To see the new text nodes and elements we create on the front end, we need to insert them into the document. The methods appendChild() & insertBefore() are used to add items to the beginning, middle, or end of a parent element, and replaceChild() is used to replace an old node with a new node.
Let's demo this by adding a list to our HTML:
<ul>
  <li>Get pizza</li>
  <li>Get burgers</li>
  <li>Get Doritos</li>
</ul>
And here’s our page:

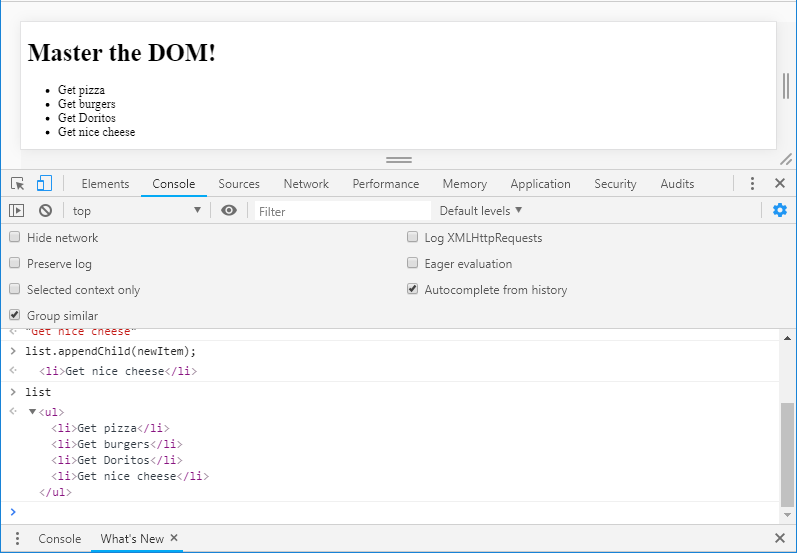
Say we want to add a new item to the end of our list, we have to create the element and add text to it first, as we did previously, like so:
// Get the ul element
const list = document.querySelector('ul');

// Create new list item
const newItem = document.createElement('li');
newItem.textContent = 'Get nice cheese';
We now have a complete element for our new list item! So we can add it to the end of the list using appendChild():
// Add our new item to the end of the list
list.appendChild(newItem);
And our new li element has been appended to the end of the ul:
To add an item to the beginning of our list, let’s create another element (we have to again create a new element, as createElement() can‘t be reused):
// Create a new list item
const anotherNewItem = document.createElement('li');
anotherNewItem.textContent = 'Get Party Whistles';
We use the insertBefore() method to add it to the beginning of our list. It will take two arguments, the first being the new child node to be added, and the second is the sibling node that will immediately follow.
parentNode.insertBefore(newNode, nextSibling);
So for our example, we’ll add the new anotherNewItem element to the start of our list, like so:
// Add a new item to the beginning of the list
list.insertBefore(anotherNewItem, list.firstElementChild);
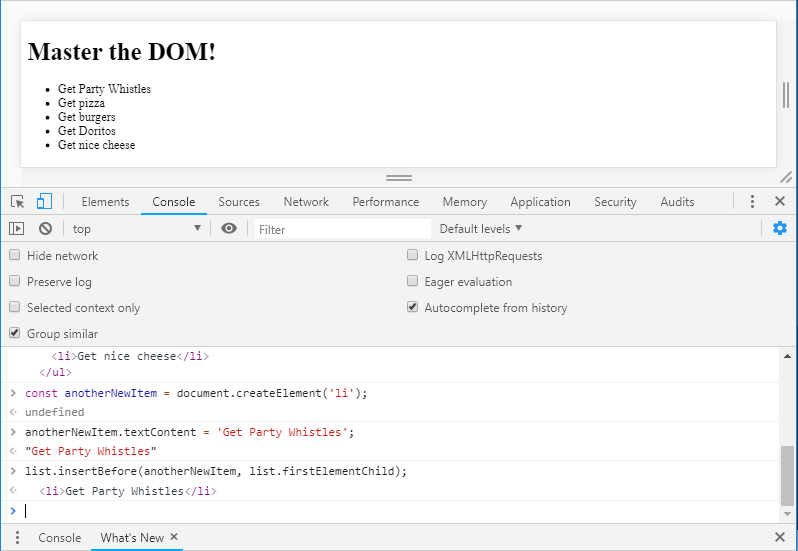
And now our new node has been added to the start of our list!
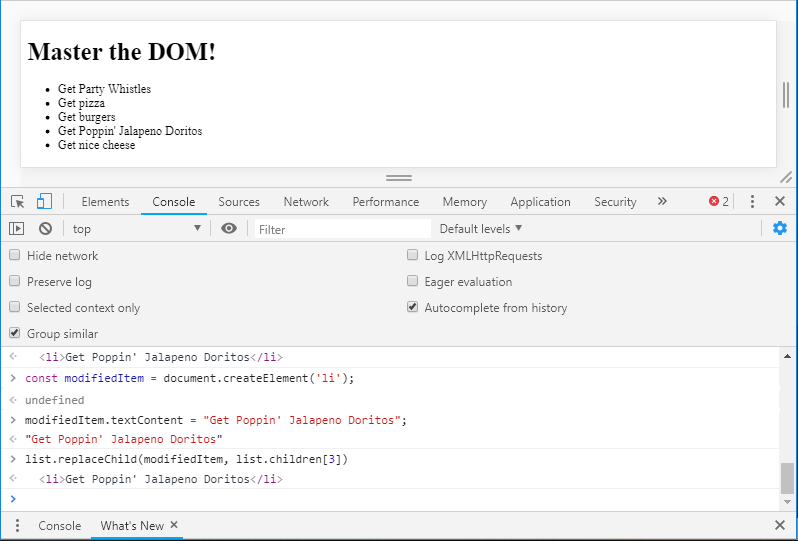
Let’s also take a look at how we can replace an existing node with a new node using replaceChild(). First, we create a new element:
const modifiedItem = document.createElement('li');
modifiedItem.textContent = "Get Poppin' Jalapeno Doritos";
replaceChild() also takes two arguments, first the new node, then the node to be replaced...
parentNode.replaceChild(newNode, oldNode);
In our example, we’re replacing the third element child on our list:
// Replace list item
list.replaceChild(modifiedItem, list.children[3])
Using a combination of appendChild(), insertBefore(), and replaceChild(), we can insert nodes and elements anywhere in the DOM!
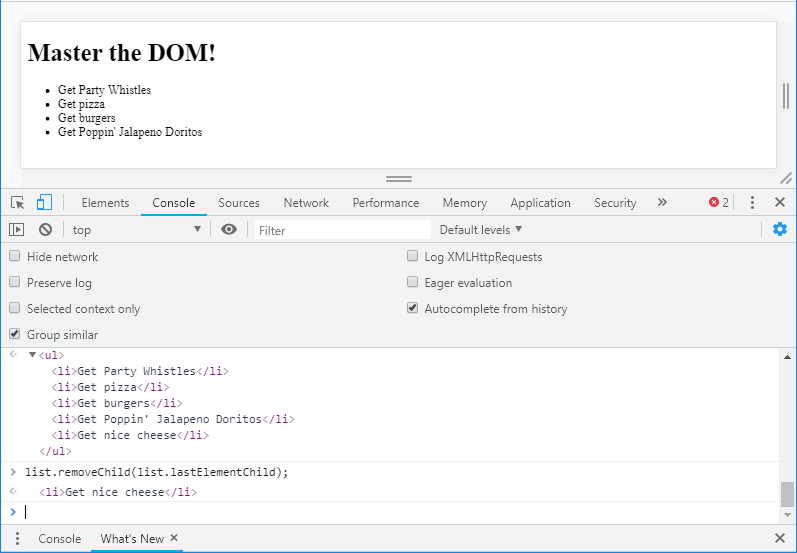
Removing Nodes from the DOM
To remove nodes from the DOM, we can use removeChild() to remove child nodes from their parent, or we can use remove() to remove the node itself.
Returning to our example let's remove the last item on our list:
// Remove the last list item
list.removeChild(list.lastElementChild);
And the result:
Alternatively, we could use remove(), to remove the node itself:
// Remove the third element from our list
list.children[2].remove();
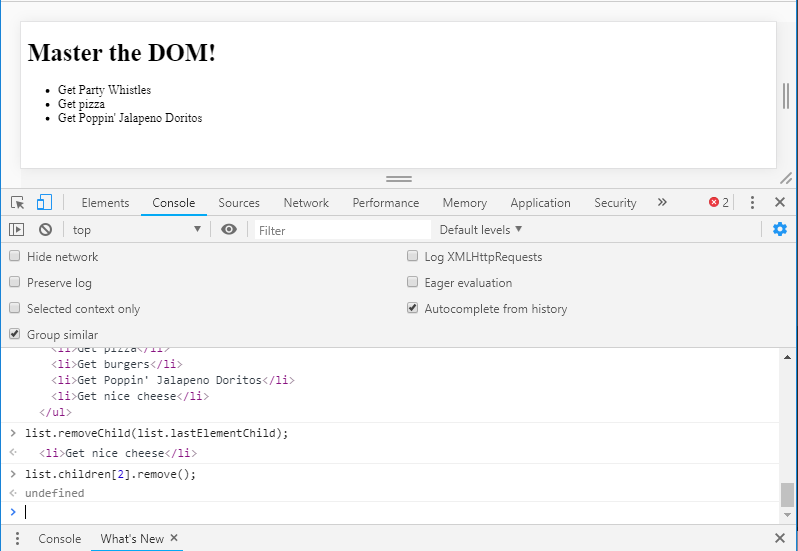
Using removeChild() and remove(), you can remove any node from the DOM.
In the next tutorial, we’ll take a look at how we can modify classes & styles in the DOM. By modifying HTML element nodes.
Related Posts:

A little about me..
Hey, I’m Tim! 👋
I’m a freelance business owner, web developer & author. I teach both new and experienced freelancers how to build a sustainable and successful freelancing business. Check out my Complete Guide to Freelancing if you'd like to find out more.
While you're here, you can browse through my blogs where I post freelancing tips, code tutorials, design inspiration, useful tools & resources, and much more! You can also join the newsletter, or find me on X.
Thanks for reading! 🎉